This article contains a lot of technical information about camera settings that will only be of interest to people with relatively modern DSLR and mirrorless cameras. It contains a few amendments from the version published in Volume 69 No. 1 of The Blue Bill, the quarterly journal of the Kingston Field Naturalists.
One of the challenges of working with current DSLR and mirrorless camera bodies is the bewildering variety of options they present. What should one do when faced with the myriad of possibilities embedded in the basic camera controls for ISO, metering, shutter speed, aperture, and autofocus modes, much less the arcane stuff buried in the custom menus (53 options in my particular camera of choice)? Isn’t there a one-size-fits-all choice of settings that will let us get on with the business of photographing birds?
Well, yes and no. Readers of this series will know that I advocate learning how to control the basic functions of the camera, and particularly the big three of ISO, shutter speed, and aperture. In the most recent article I also explored the importance of understanding and applying autofocus modes. These are functions that you may need to adjust multiple times over the course of a day out, and in my experience an ability to understand these and balance between them is one of the keys of creating good images.
So there is no single answer that works in all situations. However a quick scan through the internet will turn up a number of articles proposing the “right” settings for bird photography, by which they mean the recommended baseline settings to use most of the time. This is a good approach, and (needless to say!) I have my own recommendations. This article provides a set of good choices for standard settings, and capsule explanations for why these are recommended.
In order to confirm whether they were good ones I decided to test them during two recent birding trips by sticking as closely as possible to my recommended settings throughout the trip. The captions to the images accompanying this article will note the settings used, including any deviations from the recommended ones. A Nikon D850 camera body and a NIKKOR 500mm f/5.6E PF ED VR lens were used throughout.
All cameras manufactured in the last 30 years, with the exception of a few highly-specialized models, are capable of automatic focusing or “autofocus”.[1] Many camera models now include a range of options that can be used to optimize the autofocus effect for specific situations. This article will describe autofocus servo modes and area modes, and recommend the best choices for wildlife photographers.
Note: Different camera manufacturers use different terms to describe what are essentially the same capabilities. Because I am a Nikon user I will use Nikon terminology throughout.
On basic cameras like those in mobile phones, autofocus is always enabled. For bridge cameras, DSLRs and mirrorless cameras there is usually a switch so that users can choose whether to use automated or manual focus. Your lens or camera body should have a switch labelled AF-M or M/A-M. AF stands for autofocus and M for manual focus. Ensure that the AF-M switch is set to AF or M/A.
AF switch on Nikon 24-70mm lens.
M/A, by the way, means that the autofocus is activated but you can override it manually. This is a useful option to have when your subject is obscured, for example by foliage. The autofocus system may have a hard time finding the desired point of focus. (Remember that modern autofocus systems are “smart” to a degree, but not smart enough to understand that you want to photograph the bird and not some random twig or leaf). If you have the option to do so I recommend setting the camera to M/A so you can override the autofocus when necessary.
Once autofocus is enabled, you activate the focus system by depressing the shutter release halfway or, if you are using back-button focus, depressing the AF-On “back-button.”
There are two key sets of choices that you can make to optimize autofocus. Somewhat confusingly Nikon calls them Autofocus modes and Autofocus area modes. For the sake of clarity I will refer to them as Autofocus servo modes and Autofocus area modes.
Autofocus servo modes
There are two basic choices here. You can either lock focus on a single point, or use a tracking capability that automatically refocuses as the subject moves.
AF-S: Single servo AF
… or “One-Shot AF” for Canon cameras: This system is primarily used for stationary or slow-moving subjects. It uses a single point at the centre of the frame. When the focus system is activated – by half-pressing the shutter release or pressing the back-button – the camera will achieve and lock focus on that point.
Key point. If the camera and/or the subject moves, even if you hold the shutter release halfway down, the camera will not refocus. So small movements can lead to out-of-focus or not optimally focused images.
Note that you can customize this function using the camera menu system. There are two main options: (a) the camera will record an image when you press the shutter release (whether it is in focus or not), or (b) the shutter will not release if the image is not in focus.
Cunning photographers (I’m looking at you Phil) have learned that you can use option b to your advantage when photographing small, fast-moving birds. If you track the bird while holding the shutter release down, an image will be recorded at the fleeting moment when the camera has the bird in focus.
AF-C: Continuous servo AF
… or AI Servo in Canon-speak: This mode is optimized for moving subjects, and is the optimal choice for moving targets. While the focus system is activated the camera will continuously refocus until the shutter is released.
Key point. With AF-C activated, when you press the shutter release the camera will attempt to record an image whether it is in focus or not. So you do need to wait a moment for autofocus to find a solution. This wait time ranges from very short (less than a second) with high-end lenses at wide aperture, to several seconds with basic telephoto lenses.
One drawback of AF-C mode is that sometimes it is not as precise as AF-S, so you have to watch carefully to ensure you don’t end up with slightly out-of-focus shots.
AF-A: Hybrid mode
This is a third option often seen on lower-end DSLRs. In this mode the camera switches between AF-S and AF-C depending on whether it thinks the subject is moving or not. AF-A is intended to give a beginner the best chance of getting a good photo. The mode is not present on higher-end camera bodies because the manufacturer assumes that users will not want to cede control of such an important decision to the camera.
So to summarize, AF-S is best for stationary targets, and AF-C for moving targets.
To choose the autofocus servo mode you should consult the manual for your camera. Nikon DSLRs are controlled by depressing the AF button on the front of the camera and then moving a control wheel until the right symbol appears in the viewfinder.
AF mode button on Nikon D850.
Autofocus area modes
These options allow you to choose how the focus point is selected. In the Nikon world there are up to ten options depending on your camera body. But don’t despair: only a few of these are really useful for wildlife photography.
Pinpoint
Single point
Dynamic area modes (x4)
3D tracking
Face detection
Group
Auto-area
Pinpoint
This is a unique-to-Nikon mode that allows precise focus on a very specific point of the target. At the moment only the D850 DSLR and the Z6 and Z7 mirrorless cameras have this feature. It is not likely to be useful for wildlife photography in general, particularly since it is relatively slow to achieve focus. But it is worth considering for specific outdoor applications, e.g. macro photography of flowers, mosses and stationary (i.e. dead) insects. Note that it is only available with AF-S mode.
Single point
This is one of the most important modes for wildlife. The camera focuses on a single point at the middle of the frame. This is the fastest and most accurate of AF modes, and is particularly good for the following situations:
when you have time to compose a shot (and are using back-button focus activation). This mode allows you to zero in on the most important feature – usually the eye of the subject, and then recompose the shot knowing that the focus will remain on the chosen point. This is ideal for large mammals and birds, frogs, turtles etc that are close to the observer.
when the lighting is poor (explanation later in this article)
when your target is distant and there is a chance that using an area mode (described below) will lead to inadvertently focusing on a nearby twig or stalk of grass instead of the target
9-point Dynamic area
25-point Dynamic area
72-point Dynamic area
153-point Dynamic area
The idea of these dynamic area modes is that you can choose your focus point, and then as the subject moves the camera will “dynamically” keep the subject in focus. This is a very useful capability for photographing birds in flight, as long as you are aware of one limitation. If you wish to choose a specific initial focus point you do so by cycling between available points using a joystick or a rocker wheel on the back of the camera body. Professional photographers apparently perform this juggling act but mere mortals such as myself have enough issues to deal with in tracking a fast-moving bird without trying to manually move the focus point at the same time. Perhaps the professionals are photographing slower birds… 😊
On top of that, in order to use the joystick or rocker switch with my thumb I would have to re-route focus control from the back-button back to the shutter release, and I am unwilling to give up on the advantages of the back-button.
Camera controls – Nikon D850. Note that the rocker switch is in the locked position.
However if you are happy with a random focus point these modes work well. The Sandhill Crane below was taken using 25-point dynamic area mode. These birds were landing in waves at the Lost Mountain wildlife reserve in Saskatchewan and each group passed over very quickly. At my skill level there was no scope for picking a specific focus point but the autofocus mode did a good job selecting a usable one. (FYI I believe it is the left wingtip of the second bird). There is sufficient depth of field at f/8.0 that I’m not sure the image would have been improved if I had chosen a specific focus point.
Caveat
One thing to note is that the dynamic modes with larger numbers of focus points take slightly longer to achieve focus, and have an increased chance of focusing on something other than your desired subject.
But overall the dynamic modes are useful tools that are worth familiarizing yourself with. In order to use them the autofocus mode needs to be set to AF-C.
BTW the equivalent Canon term for Nikon’s dynamic modes is AF Point Expansion.
3D-tracking
This mode is a clever bit of technology. Once you have picked a focus point it analyzes colour differences to determine which object you want to focus on, and then uses as many focus points as necessary to keep that moving object in focus. I have not experimented much with this mode but sources I trust suggest that for birds in flight it works well against a clear background such as the sky, and less well when the background is busy. For large mammals, which are generally slower moving, this mode probably works very well. And another source reports that in a large mass of fast moving birds this mode is very good at picking out one bird and tracking it. 3D tracking mode is also only available in AF-C.
Face detection
This mode is self-explanatory. It is very useful for people photography but not really geared towards wildlife.
Group
This mode is one that I use frequently. When aimed at a group – e.g. a small flock of birds – it will focus on and track the closest member of the group. It uses only the centre point and the four others that are close to centre so it achieves focus quickly and holds it well.
Auto-area
This mode takes control of the focusing process and guesses what you wish to focus on. It seems to be intended for neophyte users who want to automate the whole photography process, so that their only responsibility is to point the camera in the general direction and hope for the best. I have not tried this mode but I understand that it is fairly good at finding faces. Otherwise it tends to focus on the nearest object. This mode is not really relevant to the wildlife photographer.
Recommendations
My first recommendation is that if you want to take full advantage of the capabilities of your camera you should learn how to change AF modes and AF area modes quickly and efficiently.
In my view the most useful AF combinations for wildlife are:
For stationary targets , especially if they are distant and/or the light is poor, use AF-S/single servo mode and a single (centre) focus point. Focus on the key feature (usually the closest eye). If you are using back-button focus you can then recompose without refocusing.
For all moving targets, use AF-C mode and one of the autofocus area modes.
Of these, I would experiment with 3D tracking for slow-moving targets (large mammals, e.g.).
For faster-moving targets, use either Group or one of the dynamic area modes. Of these I would stick to 9 or 25 point for most situations.
When I am out birding I will normally have the camera set at AF-C and 25-point area mode as this gives me the best chance of getting onto a fast-moving bird.
AF-C, 25-point dynamic area. Ring-billed Gull.
A note on low-light photography
Autofocus systems use areas of contrast to judge focus. If there is not enough detail (clearly defined edges) in the subject then the autofocus system will “hunt” – that is, cycle back and forth trying to establish a focus point. This explains why autofocus doesn’t work well in low light conditions – there is not enough contrast to achieve focus. So though your high-end DSLR can capture an image at astonishing ISO values, you will probably have to focus manually or accept blurry images. Or check your manual to see if your camera has an AF-Assist function that can help out.
The Blue Bill
This article originally appeared in the Blue Bill, the journal of the Kingston Field Naturalists, Volume 68, Number 4, December 2021.
[1] The term is a bit of a misnomer because it’s not really automatic – you still have to activate the autofocus system, or at least ensure that it is focusing on what you want it to.
How to adjust depth of field to improve your images. This article was originally published in The Blue Bill, the journal of the Kingston Field Naturalists.
In my early days as a wildlife photographer I was happy just to get a shot of the birds, beasts and insects I came across. But it wasn’t long before I started wanting to take better photographs. Looking back critically at images from a few years ago I found that some of my photos, particularly of birds and butterflies, were not as fully in focus as I wanted them to be. It was time to get a better handle on depth of field.
Depth of field is a relatively simple concept. Basically, it’s the area in a photograph where objects are acceptably sharp. Aside from exotic specialist equipment, cameras can only focus on one point. That point, and anything else at the same distance from the camera, can be precisely in focus, but anything nearer or farther will be less than optimally focused.
That’s where “acceptably sharp” comes in. Because the reduction in sharpness happens gradually, there is a range within which objects are sharp enough that they appear to be in focus. The range between the nearest and farthest objects that are acceptably sharp is called the depth of field (DOF). So as long as your subject is within that range all will be well.
(Note that apparent sharpness changes when an image is printed in a larger format, or when the observer is closer to the image, so an image that is acceptable sharp in 5×7” format may not be when blown up to 16×20”).
Why should I care about depth of field?
Landscape photographers obsess about getting maximum depth of field, and they use highly technical concepts such calculating hyperfocal distance to work out the optimal DOF. Depth of field preview functions, available on some camera models, are also used primarily in landscape photography. Fortunately we as wildlife photographers don’t need or have time to delve into those issues because our targets are constantly moving.
For us there are two main reasons to consider depth of field: to ensure that the whole target bird, turtle or butterfly is in focus, and to make an artistic choice about how much of the background should be in focus.
So back to the challenge of getting better images. I noticed that some of my photos of birds and butterflies had insufficient depth of field: typically in images of birds taken at close range the tails would be out of focus, and for butterflies one antenna was in focus but the other one was not. (See examples below).
Broad-winged Skipper. Right antenna out of focus.Broad-winged Skipper and Virginia ctenucha. One insect out of focus.
To address this issue, we need to understand the two main factors that influence depth of field: aperture size and proximity to the subject. Larger apertures reduce depth of field, as does moving closer to the subject.
If you are interested in the technical explanation for why this is so, a search of the internet will bring up multiple sources. I recommend you start with Wikipedia or Cambridge in Colour. But I believe it is not necessary to understand the physics as long as you understand the effect.
Aperture
Before we begin this section let’s refresh our memories about apertures. The aperture governs the amount of light passing through the lens. Larger apertures (bigger openings) are expressed by smaller numbers. Thus f/2.8 is a large aperture, and f/11 is a small aperture. Again, you can read up on the technical reasons for this or you can just remember the differences and move on.
The images below show the differences in depth of field as aperture size changes. Notice that the point of focus (the cocktail glass) remains constant, but the objects behind it start to become fuzzy as the aperture increases (i.e. the aperture number becomes smaller).
f/8
f/5.6
f/4
f/2.8
f/1.8
Proximity
While increasing the aperture (changing to a lower f stop) reduces DOF in a linear manner; increasing your proximity to the subject reduces DOF as an inverse square law. So as you get closer to your subject DOF decreases radically – a major challenge for macro photography.
Butterflies and odonates present a special challenge. Because they are small the temptation is to get as close as possible. But that is where the inverse square law comes into play – get too close and your DOF will be so shallow that parts of the insect will be outside the acceptably sharp range.
So how do I fix this?
The Canada Jay photos below show DOF in action. The birds were close (the images are uncropped) and there was not a lot of light available. Image 8 is taken at an aperture of f/6.3 and the tail is not acceptably sharp. Image 9, taken one half stop up at f/7.1 is noticeably better. So in principle, when taking photos of close-in subjects a higher than normal f stop (i.e. a smaller than normal aperture) is recommended. For more distant subjects a mid-range aperture should suffice.
Canada Jay at f/6.3Canada Jay at f/7.1
As a rule of thumb if there is enough good light available, apertures in the f/7.1 to f/8 level should give you a good chance of capturing all the details of a bird that is relatively close.
For butterflies and odonates, a search through my files shows that in general I got better images from remaining bit farther away, using a smaller aperture and letting my telephoto lens do its job.
White Admiral at f/8White Peacock. f/10
If your subject is cooperative, remember that a key advantage of digital cameras is that you can check your images on the camera’s monitor and see immediately whether the depth of field is correct.
DOF and artistic composition
Having made the case that ensuring adequate depth of field is important, let’s now look at a situation where you may want to limit DOF. Many sports and wildlife photographers subscribe to a fetish that background detail is to be avoided at all costs as they claim it detracts from the subject. In general I believe that wildlife is best depicted in its environment, and that means there should be background detail – an animal is not an icon to be shown detached from the ecosystem it inhabits.
However there are situations where the background detail would not add any value – perhaps it’s too far away to be sharp regardless of the aperture setting, or perhaps the background is an unattractive pile of random scrub. In those cases choosing a field deep enough to just cover the subject can create an attractive effect. The Savannah Sparrow in the image below was perched on a fence with nothing behind it but long grass. In this case an aperture of f/5.6 was enough to ensure that the bird, the wire and the one leaf below it are sharp, while the background is a sea of formless colour.
A fairly distant Hooded Mountain Tanager in its environment. f/5.6Savannah Sparrow f/5.6
Camera management for depth of field
So… let’s imagine that I have convinced you that depth of field is a thing you should consider. How should you go about controlling it?
The first step is to confirm how your camera displays the critical information: aperture, shutter speed and film speed. This information is probably displayed in your viewfinder and/or on an information panel. Check your manual to be sure, and then make a habit of keeping an eye on the aperture setting.
Modes
If you use the Programme or Automatic mode it suggests that you are relatively new to photography and need some help from the camera so you can concentrate on the subject. There is no shame here – everyone starts out using an automatic mode and those who aren’t intent on getting the best possible images can happily stay in those modes. Just be aware that by leaving all the decisions to the camera you will have no control over depth of field.
Many of the more experienced photographers use one of the semi-automatic modes: Aperture Priority (shown on the mode selector as A for Nikon cameras and Av for Canons), or Shutter Priority (S for Nikon, Tv for Canon).
In Aperture Priority mode you control the aperture setting manually. The camera will make what it thinks are necessary adjustments by changing shutter speed and (if you enable Auto ISO) film speed. If you use this mode keep a close eye on the shutter speed. For wildlife (or plants if there is a breeze) you should use shutter speeds below 1/500 sec with extreme caution. Motion blur will ruin any image regardless of how well you have judged the depth of field. If you are in Aperture Priority mode and need more shutter speed you can select higher film speeds (ISO) until you reach a point where the camera boosts shutter speed to compensate.
In Shutter Priority mode you essentially give up control of the aperture setting. If there is not enough available light your camera will default to a wide open aperture setting regardless of what you might want to see from a depth of field perspective, though in fairness most of the affordable telephoto lenses have base apertures of f/5.6 or more so even wide open there will still be some depth to the image. Again, increasing film speed will eventually cause the camera to compensate by stopping down the aperture.
There is a way to balance all elements of the light triangle – aperture, shutter speed and ISO – yourself to ensure that you can make the best decision under the circumstances. It involves taking the plunge into Manual mode – a topic for a future post.
Some random final notes
If macro photography is your thing, one way to get around the issue of very shallow depth of field is to invest in a camera that allows focus stacking. This process involves taking a large number of images of the subject with the focus point moved slightly between each image. These images are then “stacked” using software to yield a single image that is in crisp focus from one end to the other. I have seen some amazing insect and flower images taken using focus stacking. One consideration, though, is that the subject has to remain completely immobile (which usually means it needs to be dead).
Smaller apertures lead to greater depth of field, but only up to a point. Using apertures of f/11 and above can bring diffraction into play. Without delving into the technical explanation, the bottom line is that diffraction can seriously degrade the sharpness of your image. So more isn’t always better.
The notion that telephoto lenses have inherently shallow depth of field is a common myth that is repeated by many supposedly expert sites. A more accurate statement is that telephoto lenses appear to have a shallow depth of field because of the distribution of sharpness. Telephoto lenses tend to have an even distribution of acceptable sharpness in front of and behind the focus point, whereas for wide angle lenses the bias is tilted to the areas behind the focus point. In landscape photography this is an advantage because it creates a more gradual fading away of sharpness towards the horizon. But the bottom line is that a given aperture (e.g. f/5.6) will give the same depth of field with any focal length of lens.
Finally, it is a fact that the size of the sensor on your camera affects DOF. Counterintuitively, the large sensor of a full frame camera will develop a shallower depth of field at a given f stop than a camera with a cropped sensor. This is an interesting factoid, but one that’s not particularly relevant to wildlife photography. If I were in the market for a new camera body I can think of a lot of factors that I would consider before I got down to that one.
In the previous post of this series I explained what happens in a digital camera – how a batch of photons is converted into a digital file. This post will cover how to use that file to create an image which can be displayed electronically or printed. This activity is called post-processing, because the initial processing of the image is done by software within the camera.
For wildlife photography, I believe the aim of post-processing is to produce a final image that replicates what you saw as closely as possible. And by “what you saw” I mean what you saw with your eyes through your binoculars, and not what the camera thinks you saw. Modern cameras are extremely capable, but their abilities are vastly inferior to those of the eye, especially the eye aided by precision optics. Occasionally the camera will manage to capture an image exactly the way you wanted it, but most of the time, especially in wildlife photography, the raw material produced by the camera will need some help.
Dusky Antbird 1
Dusky Antbird 2
The above images show the out-of-the-box version (Dusky Antbird 1) and the final version after post-processing (Dusky Antbird 2). Which would you prefer?
This article was also published in The Blue Bill, the Quarterly Journal of the Kingston Field Naturalists, Volume 67, No 2, June 2020.
Rufous-capped Antthrush at ISO 8000
I started this article intending to talk about post- processing – the business of editing your wildlife images. But I rapidly realized that it is too big a subject to deal with at once, so I’m going to break it into manageable chunks.
How the Camera Creates an Image
The first stage of the journey requires us to look at what happens when you snap the shutter. In the days of film cameras it was relatively straightforward – light passed through the lens and onto a film of celluloid or plastic. Light-sensitive chemicals on the film reacted to the exposure, producing a negative or a slide.
Digital cameras use a different process to capture an image. As photographers we need to have a basic understanding of how this works so we can understand how the different image file formats work.
In very simple terms, in a digital camera the light is focused on a sensor, which is a grid made up of very small photosites. Each photosite contains a diode that converts light into digital information. In simplistic terms the diode counts the number of photons that fall onto it while the shutter is open, and the circuitry in the photosite coverts that information into a numerical value.
In order to provide a digital image that matches the level of detail and colour that the eye can see, a camera sensor needs to contain millions of these photosites. This density of information allows a digital image to be at least as good as an image from a film camera. But it also explains why digital image files tend to be very large. Each of those millions of photosites generates a numerical value expressed as a byte of between 12 and 24 bits. To give you an idea of how that adds up, with my current camera set to the highest resolution the information stored by those photosites totals 62 million bytes of data for a single image.
Image Formats
The camera’s onboard processors convert those digital values into an image file. There are two main formats for an image file – JPEG and Raw. These formats take very different approaches to the challenge of storing all this data. In simple terms, JPEG transforms data within the camera to produce a finished image, while Raw stores all the information and the user then processes the information at a workstation. Each approach has its the pros and cons. I want to briefly illustrate the difference so you can make an informed choice about which format to use.
JPEG
JPEG (Joint Photographic Experts Group) has emerged as the standard format for most photography tasks. For virtually all digital cameras JPEG is the default format, so if you have not been experimenting with the settings menu you are almost certainly shooting JPEG.
The JPEG format was developed to allow onboard compression of digital images. If you recall that figure of 62 million bytes you will see why for many applications there is a need to compress digital images.
Large files are problematic for several reasons:
They demand large storage capacity on your camera’s memory card
They take more time to write to the memory card, which can limit the number of images you can take in quick succession
They take up a lot of room on the storage drives of your PC, laptop, or mobile device
They require a lot of bandwidth to transmit, so websites will be slow to load and sharing is tedious
To avoid these problems the JPEG format compresses the raw information gathered by your camera sensor and then transforms it into a finished image. This image is stored on your camera’s memory card.
JPEG Advantages
For many uses JPEG format is ideal:
JPEG images are small enough to be easily viewable and shareable.*
Virtually all devices and software are compatible with JPEG files.
The simple image editing software available on your cell phone, tablet or computer is designed to use JPEG images.
JPEG is supported by HTML, the language used in creating web pages.
*Note: JPEG files can be created using different compression levels. Lower compression levels lead to better quality but also larger file size. JPEG Fine files are the least compressed (4:1) but therefore the largest. At about 10MB each in the Large size they are not easily shareable.
JPEG Disadvantages
However, there are limitations to JPEG that you should consider. Most of these limitations result from the way the JPEG algorithm compresses the image file size.
The process by which JPEG compresses a file is highly technical bordering on incomprehensible, but in the simplest possible terms it reduces the size of the file by calculating average values for 8×8 blocks of photosites (thus each block replaces 64 sets of information with one). It then reduces the level of information about colour. Based on the understanding that humans have difficulty discerning small variations of colour, JPEG looks for areas that have similar hues and replaces these small variations with a single average colour.
This process can result in a much smaller image file, but the key thing to remember about the JPEG conversion process is that once the image is created any information that the conversion algorithm considered unnecessary is lost and unrecoverable.
This is why JPEG is classified as a “lossy” format. As noted, a certain amount of information is discarded when the image is originally created. Moreover, each time you recompress the image, by making a change and then re-saving it, some additional information is irrecoverably lost. And if you crop an image – for example to provide a close-up view – the parts of the image that you cropped out are lost forever.
A further implication of JPEG is that, because it produces a final image, the camera settings in use when the image was taken are “baked in”. If you realize afterwards that you had the wrong white balance or picture control settings for example it may not be possible to correct the image.
Raw
Raw is a generic term for a file that saves all of the information from an image, with only minimal processing. This information needs to be converted and edited at a workstation before an image is produced.
Raw format is not available on all cameras. All modern digital single lens reflex cameras (DSLRs) and mirrorless cameras can shoot Raw, but only a minority of bridge cameras have the capability and point-and-shoot cameras generally do not.
Raw Disadvantages
There are several disadvantages to shooting in Raw:
Raw files are big. With the camera set-up I currently use, each image file is about 29MB. So a 64GB card will hold about 1,300 Raw files instead of 13,000 JPEGs.
You need to process your Raw files at home in order to generate finished images. This is time-consuming compared to the instant image generated by JPEG.
To process the files you need specialized image editing software (though note that you can download free editing software from your camera manufacturer – all the major camera brands provide this).
Each camera manufacturer has its own a proprietary standard, so a for example a CRW file from a Canon camera is not compatible with a NEF file a Nikon generates.
For Raw files to be printed, shared on a mobile device or posted on the internet you need to create and export a JPEG image.
So why do most professional wildlife photographers shoot in Raw?
Raw Advantages
Lossless. Raw files are lossless. All the information your camera gathered is available to you. Nothing is averaged out or approximated. As an example, an 8-bit JPEG image is limited to about 16.8 million colours, whereas a 12-bit Raw image can show up to 68.7 billion. What this means in the real world is that you will get more even transition between colours, without the possibility of the pixilation that sometime happens with JPEG (remember that JPEG averages out colours into larger blocks).
Non-destructive. The adjustments you make in post-processing do not change the original file. All changes are saved in a separate hidden file called a sidecar. So regardless of how much you crop and adjust an image, you always have the original file available. With JPEG every significant change degrades the image, and things that are cropped out cannot be recovered.
Settings are not baked in. With Raw you have complete ability to adjust most of the camera settings during post-processing, including exposure, white balance, sharpening, colour gamut, picture control, and contrast.
Greater dynamic range. Raw files are typically created in 12 or 14-bit format, compared to 8-bit for JPEG. This may not seem like a big numerical difference, but remember we are looking at a file made up of millions of bytes. The math is somewhat beyond my ken, but the impact is that in each stop of a camera’s dynamic range there is far more information space available in a Raw file. At the bottom end of the dynamic range – areas of deep shadow in a photograph – there are 65 times as many gradations in a Raw file as in a JPEG.
This has important implications for wildlife photographers. We often find ourselves trying to capture images in areas where there is both bright light and deep shadow. Using JPEG, those shadows will tend to be featureless dark blobs, whereas with Raw we will be able to see the same details that our eyes would see.
Moreover, the greater ability of Raw to capture detail in shadow allows us to apply shadow reduction – a very useful capability that I will talk about in future articles on post-processing.
Exposure Correction
But perhaps the most striking advantage comes when we shoot images at incorrect exposures. The perfect photographer would never do this, but for the rest of us there will be numerous situations were we have the camera set up for bright daylight only to have a momentary glimpse of a bird – and typically it’s a good one – peeping out of a dark corner.
The higher dynamic range of the Raw format means we can correct a badly underexposed shot in post-processing and end up with a good image.
Consider this example. I deliberately underexposed this shot of an American Goldfinch in my garden. I did this as an experiment, so please ignore the uninteresting composition. The camera took two simultaneous images – one in Raw and one in JPEG Fine.
Original image
JPEG
Raw
The images were very dark – I had to increase exposure by about four stops. But the results are clear. The quality of the Raw image is pretty good: there is full feather detail and the colours look right . The JPEG image on the other hand is dreadful. The colour is over-saturated, green blobs have appeared in the breast and belly plumage, and the whole bird looks flat and dull.
Recommendations
If you have read this far, you have probably realized that I am a fan of the Raw format. I believe that in wildlife photography the aim is should be to produce an image that replicates as closely as possible how the creature (bird/animal/plant/butterfly/reptile) looked in the wild. I have found that using Raw format and carefully post-processing the image gives me the best chance of doing that. And there is an element of craftsmanship involved that I find appealing – I prefer to make my own choices rather than having the camera make decisions on my behalf. I am also not worried about file size given that hard drive storage capacity has become increasingly inexpensive.
So is there an argument for using JPEG? The fact remains that some very good images have been created using JPEG. You may well decide that you prefer the simplicity and efficiency of JPEG. If so, I would recommend that you use the lowest compression setting: JPEG Fine. This setting creates a 4:1 compression, so the files are still fairly large, but at 4:1 you will not see any of the artifacts or errors that can creep in at higher compression ratios.
This article was also published in The Blue Bill, the Quarterly Journal of the Kingston Field Naturalists, Volume 67, No 1, March 2020.
If I had to pick a single technique that made a dramatic improvement to my capability as a wildlife photographer, I would choose Back-button Focus. It’s a technique used by professional wildlife and sports photographers, and can help you take your photography to a higher level.
It starts with the recognition that crisp focus is perhaps
the single most important quality of a good photograph.
Autofocus
Because focus is so central to photography, camera manufacturers have developed ways to make it easier to get an in-focus image. Any camera produced in the last 20 years has the ability to focus automatically – indeed autofocus is the default option, and may have to be turned off if you wish to focus manually.
Autofocus is engaged when you press down on the shutter release. This happens so quickly some beginning photographers don’t even realize it is happening, but with practise most people learn that if they depress the shutter release halfway they can focus the camera without taking a picture.
Typical DSLR – Nikon D5300
Back-button focus
For most types of photography having the autofocus engage when you press the shutter release makes life easier – a single action both focuses the image and releases the shutter. Wildlife photography, though, has its own requirements and many wildlife photographers find that the simple shutter release/autofocus approach actually creates problems.
Instead they use back-button focus, where the autofocus function is disconnected from the shutter release and assigned to a different button.
I am not going to explain how to do this. Each camera system has its own way of assigning buttons, and you will need to consult your manual to learn how to make the change on your camera. Instead, I am going to explain why you might want to make this change.
Targets obscured by foliage
If you have spent any time trying to photograph birds in the wild I am sure you will have had this experience. You are trying to capture an image of a bird roosting in a tree within a tangle of branches, twigs and leaves. You can see the bird clearly, but frustration creeps in because each time you take a shot the camera focuses on a different one of the surrounding twigs and only occasionally on the bird.
For all the capabilities of modern autofocus systems, remember that they are not actually intelligent – they try to guess what you want to focus on but they are frequently wrong.
My eye sees the bird, but the camera decides that I want to focus on a vine.
Using back-button focus can solve this problem. You centre your camera on the bird and engage the focus. You may have to do this a number of times until the focus point is actually on the bird. In cases where there is a lot of background clutter you may even have to use manual focus. But the key point is this: once you are focused on the right point you can shoot as many images as you want without the camera trying to refocus each time. As long as you stay at approximately the same distance from the bird it will remain in focus. The camera will not be able to “help” by randomly changing the focus point.
Now that’s better. Sooty-capped Hermit, nr Monterrey, Casanare, Colombia, 5 Feb 2020
And even if you have to move slightly to get a better angle, if you engage autofocus again it will most likely zero in on the bird because it will be the closest object to the focus point.
I think you will find that once you try this technique you will be reluctant to go back to shutter release focus. Time that you might have wasted in focusing and refocusing can be spent on adjusting ISO and shutter speed and choosing the right moment to shoot.
Focus and reframe
Wildlife photographers often find that they want the focus point of an image to be off-centre. There are two main situations where this occurs:
Large or close-in target
Say you have a chance to see a Moose at fairly close range. You want to capture the whole beast in an image, without cutting off its tail or legs. But you also want your focus point to be on the eye, as tends to create the most compelling image. And not surprisingly, the Moose’s eye is at one side of the image.
Composition
You have a bird in your sights but you want to frame the
image so that the bird is off-centre. You might want to better show its within
its habitat, or to give it some open space in front of it, or just because
people are more attracted to images where the main points of interest are
off-centre.[1]
In these situations back-button focus is your friend. It
allows you to focus on the desired point, and then without changing focus
reframe the image by moving the camera until you get the result you want.
Purple Finch surveys his domain. Renfrew County, Ontario, Canada, 19 Jun 2019
Note that landscape and portrait photographers deal with this need by manually adjusting the camera’s focus point. In principle this would also work for wildlife photographers, but in my experience the focus and reframe method is much more intuitive and much faster to use. For subjects that tend to move suddenly and unpredictably I think it provides better results. Moreover it allows you to set your camera adjusted to centre point focus, which is the most accurate autofocus mode.
Continuous autofocus
For moving targets, such as a bird in flight, holding down the back button allows you to keep it continuously in focus while you wait the right moment to shoot – such as when it banks to show its upper wings. You can also hold focus on a stationary target, and you will be in focus when it pounces, takes off, or otherwise moves suddenly. Without holding focus the camera will need to refocus at the critical moment, with unpredictable results.
Battle is joined. Greater Prairie Chicken, Nebraska, USA, 2 Apr 2017
In principle you could also accomplish this by holding the
shutter release halfway down, but in the real world of wildlife photography,
where you will often be wearing gloves and your hands may be stiff from the
cold, using a separate button removes the need for such fine motor control.
Of course you could just “spray and pray”, firing off twenty
images at high speed and hoping one of them works. As long as you don’t mind
everyone nearby assuming that you are clueless. 😊
Back-button focus – further advantages
While the above points are the key reasons for adopting
back-button focus, there are a few minor advantages as well:
If you are using manual focus, you won’t then risk spoiling your
own efforts when it’s time to press the shutter release.
Use of back-button focus reduces battery drain somewhat. Unlike
shutter release focus it doesn’t automatically engage the lens’s image
stabilization/vibration reduction motors.
The downsides?
Back-button focus is possible on most DSLRs and mirrorless
cameras, but it may not be possible if you are using a bridge or superzoom
camera. Check your manual to see if you can use this function.
And if you ask someone to take a picture using your camera, don’t expect great results. You can explain carefully the need to press the focus button and then press the shutter release, but I find that most people don’t “get” this and the images tend to be out of focus.
Originally published in The Blue Bill, the journal of the Kingston Field Naturalists, Volume 66, No. 4, December 2019
Freezing the Action – Shutter Speed and Shutter Priority Mode
One of the major challenges of wildlife photography (and sports photography for that matter) is the need to choose a sufficiently fast shutter speed. Like all photographers we need to balance available light, depth of field, metering modes and focus points. But unlike, say, landscape or portrait photographers our subject matter tends to move quickly in unpredictable ways.
If our camera’s shutter speed is fast enough we will be able to “freeze” the action of fast-moving subjects and get a crisp image. So in principle the solution is to always use a fast shutter speed. And there are some circumstances where this approach will work. But much more often we will be engaged in a balancing act, adjusting variables such as shutter speed, aperture, and film speed (ISO) to get a correct exposure.
The Basics of Exposure
In very simple terms the image your camera produces is governed by the amount of light that falls on the sensor. A correctly exposed wildlife image will show the creature or plant in natural light with no areas that are too dark (underexposed) or too bright (overexposed), and will be crisp with no motion-induced blurring. Photo 1 shows an American Pipit, and to my eye the exposure is good – all detail is visible and the bird’s foot is frozen in mid-stride.
Photo 1 – American Pipit
Exposure is controlled by three settings: aperture (the amount of light that the lens allows to reach the sensor); shutter speed (the length of time that the sensor is exposed to the light); and film speed or ISO (the sensitivity of the sensor).[1]
Each of these variables has implications that the photographer needs to understand:
Shutter speed
As noted above, the primary way to get a crisp exposure of a moving animal (or a plant blowing in the wind) is to use a fast shutter speed. The downside of fast shutter speeds is that less light reaches your camera’s sensor. Shutter speed is expressed in fractions of a second. Each step up in shutter speed (e.g. from 1/250 to 1/500) halves the amount of light available. So except in very bright, sunny conditions faster shutter speeds can lead to underexposed images. To an extent you may be able to fix underexposure in post-processing, but artificially adjusting the exposure by more than a small amount adversely affects the quality of the image.
For stationary subjects you can use a slower than normal shutter speed and hope for the best, but typically the creature will move just as you snap the shutter. Photo 2 is a Coatimundi seen just after dawn. I had to use a slow shutter speed and a high film speed to get the shot. If you look closely you will see that the face is slightly blurry as it moves its head to the side.
Photo 2 – Coatimundi
So if shutter speed isn’t the whole solution, what else can you do to increase your chances of getting a crisp image?
Aperture
Wide apertures allow more light in, so in the low-light conditions we are often dealing with a wide aperture seems like a good choice. The more light that passes through the lens, the faster your shutter speed can be. But as you might guess there are no easy solutions here. First, telephoto lenses capable of wide apertures are ruinously expensive. For example the Nikon NIKKOR 300MM ƒ2.8G ED lens, a favourite of professional wildlife photographers, will set you back a cool $6899.99 plus HST. So most of us will be using lenses with narrower apertures, and thus will have less light to play with.
Moreover, the wider the aperture, the shallower the depth of field. For the wildlife photographer, this creates a problem: the image may be correctly exposed but parts of the creature are not in focus. Photo 3, a Pearl Crescent, is correctly exposed. But even at ƒ7.1, a middle of the range aperture, the depth of field is shallow enough that the wing closest to the viewer is not in focus. The tails of birds can also fall prey to depth of field issues. In photo 4 the tail of the Canada Jay is a bit soft-edged, as it was beyond the optimal depth of field.
Photo 3 – Pearly Crescent
Photo 4 – Canada Jay
Film Speed (ISO)
Before the advent of digital cameras, photographers adjusted for low-light or fast-moving subjects by using faster film. So instead of ISO 64 or 100 film they might switch in a roll of ISO 200. This involved a big trade-off in image quality, as faster films producing grainer images. ISO 400 was about the maximum usable speed.
Now we have digital cameras capable of ISO equivalents of up to 51,000 so is the problem solved? Yes and no. Good quality digital cameras can produce very good images at higher ISO ratings, but only to a point. Just as fast film was prone to graininess, digital camera sensors can generate “noise” at higher speeds.
With my camera I can get excellent images at ISO 800, and very good ones up to ISO 1000. Speeds faster than that can work reasonably well depending on what you want the image for. Photo 2, for example, was shot at ISO 2000. The image is reasonably crisp and good enough for a record shot, but if you look above and to the right of the creature’s haunches you will see that the image becomes fuzzy (“noisy”) with some random colour blobs.
So what does it all mean? Simply that there is no single recipe for achieving crisp, properly exposed images of wildlife. While we are in the field we have to make continuous judgments about shutter speed, aperture and film speed to enable us to get the images we want.
Shutter Priority Mode
If you spend too much time thinking about these variables you may end up missing some of the action you went out to photograph. So most wildlife photographers use their camera’s mode system to automate part of this work.
All DSLRs and most bridge cameras have four basic operating modes: Manual, Shutter Priority, Aperture Priority and Program. I want to explain Shutter Priority mode here because I think it is the most useful option for wildlife photographers.
Your camera will have an easily accessible way of selecting this mode – most often by a rotating dial on the upper right side (Photo 5). For most DSLRs rotating the dial to S puts you in shutter priority mode. Eccentrically, Canon and Pentax call it “Tv” for time value, but the effect is the same.
Photo 5 – Nikon D5300
When you are operating in this mode, you can select the film speed and shutter speed you desire and the camera will automatically adjust the aperture within its limits to ensure a correct exposure. If there is not enough light to get a correct exposure at maximum aperture the camera will warn you somehow, often by inactivating the shutter release. Check your manual to see how your own camera works and what adjustments you can make.
You can actually go a step further and automate your choice of film speed as well. Somewhere in the menu system of your camera there will be an option to select “auto ISO”. This is a tempting option for wildlife photography, as it minimizes the chance of a missed shot. However beware of the fact that cameras left to their own devices tend to bump up the film speed to fairly high levels, so if you use this function check your manual to see if you can set an upper limit on auto ISO.
Recommended Shutter Speeds
So the final piece of the shutter speed puzzle is: how fast is fast enough?
In principle, unless forced to by low light I would recommend a minimum shutter speed of 1/500 for wildlife. Birds and mammals, even if they appear stationary, are often flicking their ears or looking around, so it’s best to err on the safe side. I did a quick check of the wildlife photos I am most proud of and almost all were shot at 1/500 or 1/640. There are exceptions, such as the Chestnut-naped Antpitta at photo 6 (1/00 at ƒ5.6) but I was fortunate that the bird held still for a moment.
Photo 6 – Cjestnut-naped Antpitta
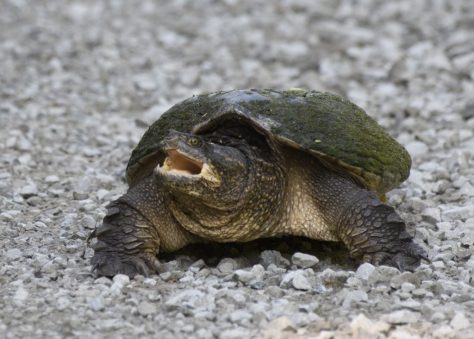
For frogs, turtles, and perched butterflies and odonates you can often get by with a slower speed, as they can sit still for lengthy periods. But the Snapping Turtle at photo 7 was being aggressive so I needed 1/500 to freeze her.
Photo 7 – Snapping Turtle
Special Cases
Birds in Flight
There is a simple rule of thumb here: the fastest shutter speed you can manage is the one to choose. But you can cheat to some extent based on the type of bird and its activity. The Trumpeter Swan has fairly slow wingbeats, so in photo 8 even 1/250 was enough to get a crisp image. The gliding Red-tailed Hawk in photo 9 was shot in bright daylight so I was able to go to 1/3200 and ensure that the image was crisp.
The Greater Prairie Chickens at a lek in photo 10 were tricky. We were shooting at dawn so there was very little light available, and the birds were actively jousting. I found through trial and error that a shutter speed of 1/2000 was enough to freeze the action. To make that work I had to bump the ISO up to 8000. The resulting image is reasonably good.
Photo 8 – Trumpeter Swan
Photo 9 – Red-tailed Hawk
Photo 10 – Greater Prairie Chickens
By the way, don’t even think about trying to photograph butterflies in flight. That way lies madness.
Hummingbirds
Hummingbird wingbeats are so fast that it is difficult to get a crisp image even in optimal light. Shutter speeds of at least 1/3200 will be needed. And because their wings move in strange ways to allow them to hover, even if you do get a crisp image it will often look rather odd. So unless you can find a perched bird, I find the best approach is to intentionally allow a bit of blur in the wings, which gives the impression of movement. The Western Emerald in photo 11 was shot at 1/320 while hovering. This is about right for the wings, but as you can see the tail is a bit blurred, so a slightly faster speed would have resulted in a better image.
Photo 11 – Western Emerald
So that’s the bluffers’ guide to shutter speed. if you have mastered the basic operation of your camera and want to dip your toe into more advanced options why not try experimenting with shutter priority?