Today’s Bird of the Day is the aptly-named Band-tailed Seedeater.
Seedeaters are small passerines that feed on… wait for it… seeds. They were originally thought to be relatives of sparrows, but further study places them with Tanagers in the Thraupidae family.
Or at least that is true of the seedeaters of Central and South America. There are also seedeater species in Africa, but they are members of the finch family Fringillidae.
Confused yet? Not to worry. You can just appreciate them for their understated elegance and industriousness.
We spotted this one in the Laguna de Siecha, a former gravel pit in the Eastern Andes. (To birders, gravel pits are almost as exciting as sewage lagoons!). The target bird was the rare and endangered Bogotá Rail. Were we successful in our quest? Stay tuned! 🙂
Laguna de Siecha, Cundinamarca District, Colombia, December 2017.
Bird of the Day #6 – House Wren
Originally posted to Facebook on 14 April 2020.
Spring migration seems to be about a week early this year. Whilst walking home in a socially-distant way last week I spotted one of these wee beasties – a House Wren – hopping around in a shrub. They are common birds in southern Ontario, normally arriving towards the end of April.
One authority claims that they are the most widespread bird species in the Americas. They can be found from the southern tip of South America up to as far as Fort McMurray.
To be precise the bird in this photo is a member of the Northern subspecies of House Wren population. Southern House Wrens live in Central and South America and are non-migratory.
Kingston, Ontario, April 2020.
Southern House Wren, Senda Mitú Cachivera, Vaupes District, Colombia, January 2020
And it may well be the bird of the year too! Lark Sparrows are fairly common birds on the Great Plains but they are flat-out Rare Birds in Southern Ontario.
So when the news went out on the Kingston bird hotline that Gerard Philips had found one in the City, the QRF was launched. Fortunately I was on my way back from Prince Edward Point so my optics and camera were at hand.
The bird led us a merry chase. We were just getting onto it when a citizen decided to ride his bike up the dead-end path the bird was foraging on. The bird fled the scene and became very alert and elusive. We had a few tantalizing glimpses which were enough to confirm the ID, but after an hour we concluded that a photograph was not going to happen.
I was packing my car when Irwin and Sandra showed up, so being a good Boy Scout I showed them where to look and described the bird’s behaviour. No sooner had I finished and wished them good luck when up popped the bird, which proceeded to go through its full range of poses. 😊
Lark Sparrows breed from BC to Manitoba and through the Midwest States, and winter in Mexico. This bird is in first winter plumage, meaning it was born this year and is new to this migration gig. It seems he may have taken a wrong turn at Albuquerque.
Commodore’s Cove, Kingston, Ontario, 24 October 2020.
Bird of the Day #5 – Inca Jay (Green Jay)
Originally posted to Facebook on 13 April 2020.
Here’s a little tropical colour for a grey rainy day. Green Jays are noisy and gregarious jays that can be found in woodlands ranging from the southern tip of Texas down to Bolivia. This individual was seen in the eastern Andes of Colombia.
The International Ornithologists’ Union has split this species into two, with birds from South America now called Inca Jays. But the ever-stodgy American Ornithological Society does not agree.
I had to lighten up this image so you can see the eye. Coots otherwise look like black blobs with a white bill.
Despite the interminable plague I have been managing to chip away at my Ontario year list. I didn’t see any Coots during the spring migration as they don’t normally visit urban gardens. However yesterday we found about 22 in Elevator Bay so that’s one more tick on the checklist.
Yesterday was dank and grey and didn’t look very promising, but we managed to find quite a few good species including a couple of late warblers and vireos, the scarce Lincoln’s Sparrow, and the even scarcer Vesper Sparrow. I ended up with three new year birds and my companion, who is a recent convert to the cult, reckons he got somewhere close to 20 life birds. So the moral of the story is – when in doubt, just go out!
The American Coot hangs around with ducks and looks vaguely duckish, but along with crakes, gallinules and moorhens it is a member of the rail family Rallidae. The migratory population of Coots breed in ponds and marshes across North America, and migrate to the southern States, Central America and the Caribbean for the winter.
This image shows a bird in Colombia at a nice sewage lagoon where they are year-round residents. Given a choice I might like to live in Colombia as well, though perhaps not in a sewage lagoon.
The pelican is a traditional symbol for Jesus Christ because it was believed that the pelican pierced its own breast to feed nestlings with its blood. Dante called Christ “nostro pelicano”.
So this American White Pelican seems like a good Easter choice for the Covid-morale-enhancing Bird of the Day.
In Ontario their stronghold is in the Lake of the Woods/Rainy River district, but there is a small and possibly growing population at the west end of Lake Erie.
Yesterday a small flock of these finches showed up in our back garden. It was, as they say, the first record for this site. They were back again today being their usual selves, attempting to bully much larger birds that were resisting being dislodged from the perches on the feeder. Delightful little bundles of energy!
Optional bird nerd stuff: Pine Siskins are a common breeding bird of the boreal forest. They normally live year-round in the North, roaming around in search of food. However this year they are visiting southern regions including Southern Ontario.
The process is known as irruption. When there is a poor crop of food (pine cones in this case) in their habitat a species can irrupt – move outwards in large numbers to find better feeding grounds. This is a different phenomenon from migration because it driven by circumstance and is not an annual event.
Those in the know have been expecting a Siskin invasion this year, because we subscribe to an extremely useful tool known as the Winter Finch Forecast. 🙂
IUCN Conservation Status: Least Concern.
Algonquin Provincial Park, Ontario, April 2018.
Bird of the Day #3 – Trumpeter Swan
Originally posted to Facebook on 11 April 2020.
As my small way of adding some beauty to your lives in these challenging times, I will be posting a bird of the day every day until the all clear is sounded.
These are Trumpeter Swans: North America’s heaviest native bird. They were nearly hunted to extinction – by 1933 the known wild population was 70. When a few thousand swans were discovered in a remote corner of Alaska in the 1950’s a reintroduction program was started. It has been a fantastic success, and there are now over 16,000 birds.
They are regular winter visitors to Ontario, often seen in large numbers in the open water around the Rideau Canal locks.
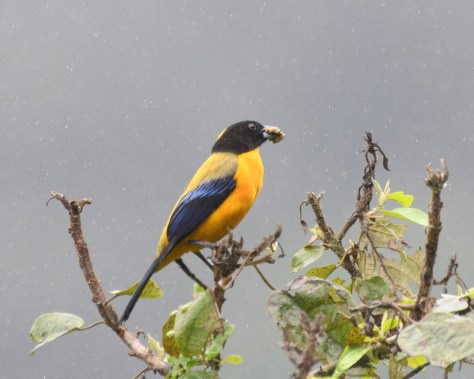
The Black-chinned Mountain Tanager is today’s Bird of the Day feature.
This species inhabits moist forests in the Western Andes of Colombia and Ecuador at altitudes between 900 and 2,200m.
It was indeed a moist forest when this photo was taken, and grey and misty as well. In a whole day of birding I only managed to get the camera out of its waterproof bag a few times. So this is not a great image… but it’s atmospheric. 🙂
Status: Uncommon or locally fairly common in Ecuador, uncommon and very local in Colombia. Conservation status: Least Concern.
The second in the Bird of the Day series was the Swainson’s Thrush.
Swainson’s Thrush is a member of the genus Catharus . It and its similar-looking cousins the Veery, Hermit Thrush, Grey-cheeked Thrush and Bicknell’s Thrush breed in the boreal forest and winter in South America. Northbound birds will start to move through southern Ontario in a couple of weeks.
The Catharus genus also includes nine species of Nightingale-Thrushes, which, sadly, are non-migratory.
Status: Common to very common transient and winter resident in Colombia. Common transient across North America, common boreal forest breeding species. Conservation status: Least Concern.
Whilst stuck at home during the first wave of the pandemic I started posting a Bird of the Day on Facebook, as a way of bringing some brightness into the pervasive gloom. This has taken on a life of its own, and today’s bird was #194 in the series.
Of course, not everyone is on Facebook. One of my readers suggested that I post the birds to this blog as well. The reader happens to be my Mom, so I am taking that suggestion as direction. 😊
So I am going to start posting the birds here as well. The text will be the same as on Facebook so if you have already seen it you can just scroll on to the next notification on your device of choice.
In each post I will show the bird from today and also include a previous bird of the day. So in 193 days or so we should be all caught up!
Bird of the Day # 194 – the Marabou Stork
As a break from all those glamorous hummingbirds and tanagers, today’s bird is from the homely end of the spectrum. I can’t say for sure that this is the ugliest bird in the world, but it’s the ugliest one I have seen.
The Marabou Stork is a large member of the stork family, with some individuals standing over 150cm/60″ tall. They live in Africa where they are a common sight, usually at the corpse of a large animal where they battle for scraps with the vultures.
For more on its eating habits, Wikipedia notes that: “This large and powerful bird eats mainly carrion, scraps, and faeces but will opportunistically eat almost any animal matter it can swallow. It occasionally eats other birds including Quelea nestlings, pigeons, doves, pelican and cormorant chicks, and even flamingos. During the breeding season, adults scale back on carrion and take mostly small, live prey since nestlings need this kind of food to survive. Common prey at this time may consist of fish, frogs, insects, eggs, small mammals and reptiles such as crocodile hatchlings and eggs, and lizards and snakes. Though known to eat putrid and seemingly inedible foods, these storks may sometimes wash food in water to remove soil.”
In the previous post of this series I explained what happens in a digital camera – how a batch of photons is converted into a digital file. This post will cover how to use that file to create an image which can be displayed electronically or printed. This activity is called post-processing, because the initial processing of the image is done by software within the camera.
For wildlife photography, I believe the aim of post-processing is to produce a final image that replicates what you saw as closely as possible. And by “what you saw” I mean what you saw with your eyes through your binoculars, and not what the camera thinks you saw. Modern cameras are extremely capable, but their abilities are vastly inferior to those of the eye, especially the eye aided by precision optics. Occasionally the camera will manage to capture an image exactly the way you wanted it, but most of the time, especially in wildlife photography, the raw material produced by the camera will need some help.
Dusky Antbird 1
Dusky Antbird 2
The above images show the out-of-the-box version (Dusky Antbird 1) and the final version after post-processing (Dusky Antbird 2). Which would you prefer?
The next stop on my world tour of great birding sites is Hato la Aurora. I posted about this site a few months ago, so I won’t repeat all the detail – you can read about it here. Suffice it to say that the Llanos region of Colombia and Venezuela is a must-see for world birders. And why take just my word for it? The Colombian newspaper El Espectador recently rated the site as one of their seven top places to see birds in Colombia.
The next in my personal list of top birding sites is one that’s on every British birder’s bucket list: Fair Isle.
Fair Isle, Scotland
⭐⭐⭐⭐⭐
Rating: 5 out of 5.
Fair Isle is a small island, about 5km long and 2.4 wide, with a population of about 50 people. It sits roughly halfway between the most northerly island in the Orkney archipelago and the southern tip of the Shetlands.
Fair Isle is legendary as a place where rare birds can be seen. Not necessarily rare as in endangered, but rare as in almost-never-seen-in-Western Europe. Why these birds choose Fair Isle is not entirely clear, but every September and October birders flock there in hopes of adding exotica to their British bird lists. In 2012 I had the chance to go there as part of an Army Ornithological Society expedition, ably organized by Tim Cowley and Andrew Harrison.
The Fair Isle Experience
Birding Fair Isle is not without its challenges. It’s not an easy place to get to, and once there the only place to stay is at the Bird Observatory Guesthouse. Not that this was a hardship – the meals were excellent and the beds were comfy. But there is limited capacity so rooms have to be booked well in advance.
And on the subject of the Lodge – in March 2019 the Observatory and Guesthouse suffered a catastrophic fire. It is now being rebuilt, and if all goes well it will reopen in the Summer or Autumn of 2021.
The daily routine on Fair Isle begins before dawn with a walk to check out one of the areas where migrant birds collect. Then back to the lodge for a hearty breakfast. By then the wardens will be in the midst of their daily rounds and reports will be arriving about what birds are being seen and where.
A somewhat younger me on Fair Isle.
After breakfast it’s back to patrolling. The Observatory staff will make a couple of runs to drop birders off at their desired locations, which is handy because otherwise all travel on the island is by shank’s mare. Then walking and birding until lunch, then more walking and birding, then dinner, followed perhaps by a pint at the bar. Then rest and repeat.
The routine is broken if a mega-rarity is seen. In that case the Observatory van goes careening around the island flying a red flag. All available souls pile in and then van heads for the site where the bird was last seen.
Rarities and Mega-rarities
We spent five days on the island and had an amazing haul of really good birds. The truly exotic finds (given with their normal ranges) included: Paddyfield Warbler (India, Bangladesh, and Kazakhstan); Lanceolated Warbler (Russia to Japan); Pechora Pipit (between Kamchatka and Indonesia), and Arctic Warbler (Northern Russia to Alaska, wintering in Southeast Asia). We also had great views of some Western Palearctic species that rarely venture as far as Britain: Red-backed Shrike, Red-breasted Flycatcher and Bluethroat being highlights.
Sadly, my visit was in my pre-photography days so I just have a few cellphone pictures to add – you will have to Google the rest if you want to see them. Start with this beauty.
PG Tips. But the mega of megas was a sighting of Pallas’s Grasshopper Warbler, known to British birders as PG Tips. To give you an idea of the grip this bird has on birders, one fellow who was at the lodge while we were there said that he had come every October for 20 years hoping to see one. It breeds in places like Siberia and Manchuria and winters from India to Indonesia.
I’m not sure why this one species has so captured the imagination, but as luck would have it one dropped by during our trip. Like all Old World warblers it is a skulking bird with cryptic plumage, but it was relocated in a field full of long grass. Eventually everyone present managed to get a brief view, but when the wardens decided to ring the bird we were all hoping to get a closer look.
And we did. Hosanna!
The mythical wee beastie revealed.
How to get there
First, you need to get to Shetland. Loganair flights run from places like Aberdeen to Sumburgh Airport, and an overnight ferry service runs from Aberdeen to Lerwick. Once on Shetland mainland you need to make your way to a little airstrip (Tingwall) outside Lerwick where a worryingly small Airtask aircraft makes the hop to Fair Isle. Alternately, if you are keen on adventure and regurgitation, the Good Shepherd IV, a fishing boat, will take you from Grutness near Lerwick to the island over some of the roughest seas available.
Tingwall. The blue and white miniature airplane on the left goes to Fair Isle
Fair Isle airport is a single gravel airstrip, so if the wind is too far off from the axis of the runway aircraft cannot land or take off. Your plans need to be flexible enough to allow for being stuck on the island for extra days (yay!) or stuck in Lerwick waiting for a flight (boo!).
Would I go back to Fair Isle? In a heartbeat. Is it likely to happen? Hard to say, but if not at least I got a chance to live the Fair Isle experience. 😊
Cape St Mary’s, and its Québec cousin Bonaventure Island (still on my to-do list), are without doubt two of the best places in the world to see one of the world’s great birds: the Northern Gannet.
These mighty pelagic birds spend most of their lives out at sea, but once a year they come to land to nest. Their preferred nesting area is a sea stack – a pillar of rock with no connection to the land, so their chicks can be safe from terrestrial predators.
Most of the big Gannet colonies such as Ailsa Crag give good views of flying Gannets but aren’t accessible for close-in views. But the sea stack at Cape St Mary’s is very close to the land. We were able to stand and view the Gannets from about 30m distance, close enough to observe their nesting behaviour and the tenderness with which they treat their mates. And needless to say the photographic possibilities are awesome.
The cliffs around the sea stack also provide nesting opportunities for Black-legged Kittiwakes, Guillemots, Razorbills and Black Guillemots, as well as the occasional Thick-billed Murre. We also saw some interesting birds in the grassy fields around the visitor centre, including American Pipits and Horned Larks. (Though not, as the Visitor Centre suggests, Water Pipits. Were a Water Pipit to show up in North America it would be the first, and would be pursued by hordes of birders from across the continent).
Black-legged Kittiwake
Razorbill
Guillemot, or if you wish to be tedious, Common Murre
Sneaky Thick-billed Murre. I waited 40 minutes for it to raise it’s head so I could see the field mark. 🙂
Cape St Mary’s is at the south end of the Avalon peninsula so it’s a bit of a trek to get there. We managed to combine it with a whale-watching trip from Bay Bulls in a one-day trip out of St John’s.
So if you haven’t been there yet, once the pandemic is subsided the doctor prescribes a visit to Cape St Mary’s! 😊