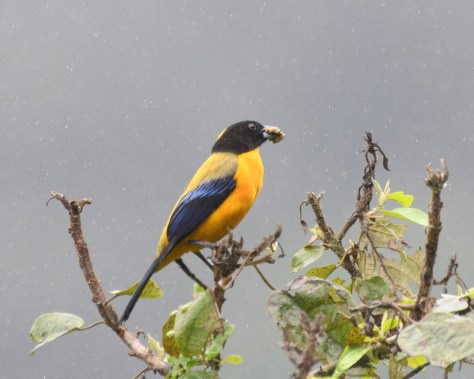
The Black-chinned Mountain Tanager is today’s Bird of the Day feature.
This species inhabits moist forests in the Western Andes of Colombia and Ecuador at altitudes between 900 and 2,200m.
It was indeed a moist forest when this photo was taken, and grey and misty as well. In a whole day of birding I only managed to get the camera out of its waterproof bag a few times. So this is not a great image… but it’s atmospheric. 🙂
Status: Uncommon or locally fairly common in Ecuador, uncommon and very local in Colombia. Conservation status: Least Concern.
The second in the Bird of the Day series was the Swainson’s Thrush.
Swainson’s Thrush is a member of the genus Catharus . It and its similar-looking cousins the Veery, Hermit Thrush, Grey-cheeked Thrush and Bicknell’s Thrush breed in the boreal forest and winter in South America. Northbound birds will start to move through southern Ontario in a couple of weeks.
The Catharus genus also includes nine species of Nightingale-Thrushes, which, sadly, are non-migratory.
Status: Common to very common transient and winter resident in Colombia. Common transient across North America, common boreal forest breeding species. Conservation status: Least Concern.
Whilst stuck at home during the first wave of the pandemic I started posting a Bird of the Day on Facebook, as a way of bringing some brightness into the pervasive gloom. This has taken on a life of its own, and today’s bird was #194 in the series.
Of course, not everyone is on Facebook. One of my readers suggested that I post the birds to this blog as well. The reader happens to be my Mom, so I am taking that suggestion as direction. 😊
So I am going to start posting the birds here as well. The text will be the same as on Facebook so if you have already seen it you can just scroll on to the next notification on your device of choice.
In each post I will show the bird from today and also include a previous bird of the day. So in 193 days or so we should be all caught up!
Bird of the Day # 194 – the Marabou Stork
As a break from all those glamorous hummingbirds and tanagers, today’s bird is from the homely end of the spectrum. I can’t say for sure that this is the ugliest bird in the world, but it’s the ugliest one I have seen.
The Marabou Stork is a large member of the stork family, with some individuals standing over 150cm/60″ tall. They live in Africa where they are a common sight, usually at the corpse of a large animal where they battle for scraps with the vultures.
For more on its eating habits, Wikipedia notes that: “This large and powerful bird eats mainly carrion, scraps, and faeces but will opportunistically eat almost any animal matter it can swallow. It occasionally eats other birds including Quelea nestlings, pigeons, doves, pelican and cormorant chicks, and even flamingos. During the breeding season, adults scale back on carrion and take mostly small, live prey since nestlings need this kind of food to survive. Common prey at this time may consist of fish, frogs, insects, eggs, small mammals and reptiles such as crocodile hatchlings and eggs, and lizards and snakes. Though known to eat putrid and seemingly inedible foods, these storks may sometimes wash food in water to remove soil.”
In the previous post of this series I explained what happens in a digital camera – how a batch of photons is converted into a digital file. This post will cover how to use that file to create an image which can be displayed electronically or printed. This activity is called post-processing, because the initial processing of the image is done by software within the camera.
For wildlife photography, I believe the aim of post-processing is to produce a final image that replicates what you saw as closely as possible. And by “what you saw” I mean what you saw with your eyes through your binoculars, and not what the camera thinks you saw. Modern cameras are extremely capable, but their abilities are vastly inferior to those of the eye, especially the eye aided by precision optics. Occasionally the camera will manage to capture an image exactly the way you wanted it, but most of the time, especially in wildlife photography, the raw material produced by the camera will need some help.
Dusky Antbird 1
Dusky Antbird 2
The above images show the out-of-the-box version (Dusky Antbird 1) and the final version after post-processing (Dusky Antbird 2). Which would you prefer?
The next stop on my world tour of great birding sites is Hato la Aurora. I posted about this site a few months ago, so I won’t repeat all the detail – you can read about it here. Suffice it to say that the Llanos region of Colombia and Venezuela is a must-see for world birders. And why take just my word for it? The Colombian newspaper El Espectador recently rated the site as one of their seven top places to see birds in Colombia.
The next in my personal list of top birding sites is one that’s on every British birder’s bucket list: Fair Isle.
Fair Isle, Scotland
⭐⭐⭐⭐⭐
Rating: 5 out of 5.
Fair Isle is a small island, about 5km long and 2.4 wide, with a population of about 50 people. It sits roughly halfway between the most northerly island in the Orkney archipelago and the southern tip of the Shetlands.
Fair Isle is legendary as a place where rare birds can be seen. Not necessarily rare as in endangered, but rare as in almost-never-seen-in-Western Europe. Why these birds choose Fair Isle is not entirely clear, but every September and October birders flock there in hopes of adding exotica to their British bird lists. In 2012 I had the chance to go there as part of an Army Ornithological Society expedition, ably organized by Tim Cowley and Andrew Harrison.
The Fair Isle Experience
Birding Fair Isle is not without its challenges. It’s not an easy place to get to, and once there the only place to stay is at the Bird Observatory Guesthouse. Not that this was a hardship – the meals were excellent and the beds were comfy. But there is limited capacity so rooms have to be booked well in advance.
And on the subject of the Lodge – in March 2019 the Observatory and Guesthouse suffered a catastrophic fire. It is now being rebuilt, and if all goes well it will reopen in the Summer or Autumn of 2021.
The daily routine on Fair Isle begins before dawn with a walk to check out one of the areas where migrant birds collect. Then back to the lodge for a hearty breakfast. By then the wardens will be in the midst of their daily rounds and reports will be arriving about what birds are being seen and where.
A somewhat younger me on Fair Isle.
After breakfast it’s back to patrolling. The Observatory staff will make a couple of runs to drop birders off at their desired locations, which is handy because otherwise all travel on the island is by shank’s mare. Then walking and birding until lunch, then more walking and birding, then dinner, followed perhaps by a pint at the bar. Then rest and repeat.
The routine is broken if a mega-rarity is seen. In that case the Observatory van goes careening around the island flying a red flag. All available souls pile in and then van heads for the site where the bird was last seen.
Rarities and Mega-rarities
We spent five days on the island and had an amazing haul of really good birds. The truly exotic finds (given with their normal ranges) included: Paddyfield Warbler (India, Bangladesh, and Kazakhstan); Lanceolated Warbler (Russia to Japan); Pechora Pipit (between Kamchatka and Indonesia), and Arctic Warbler (Northern Russia to Alaska, wintering in Southeast Asia). We also had great views of some Western Palearctic species that rarely venture as far as Britain: Red-backed Shrike, Red-breasted Flycatcher and Bluethroat being highlights.
Sadly, my visit was in my pre-photography days so I just have a few cellphone pictures to add – you will have to Google the rest if you want to see them. Start with this beauty.
PG Tips. But the mega of megas was a sighting of Pallas’s Grasshopper Warbler, known to British birders as PG Tips. To give you an idea of the grip this bird has on birders, one fellow who was at the lodge while we were there said that he had come every October for 20 years hoping to see one. It breeds in places like Siberia and Manchuria and winters from India to Indonesia.
I’m not sure why this one species has so captured the imagination, but as luck would have it one dropped by during our trip. Like all Old World warblers it is a skulking bird with cryptic plumage, but it was relocated in a field full of long grass. Eventually everyone present managed to get a brief view, but when the wardens decided to ring the bird we were all hoping to get a closer look.
And we did. Hosanna!
The mythical wee beastie revealed.
How to get there
First, you need to get to Shetland. Loganair flights run from places like Aberdeen to Sumburgh Airport, and an overnight ferry service runs from Aberdeen to Lerwick. Once on Shetland mainland you need to make your way to a little airstrip (Tingwall) outside Lerwick where a worryingly small Airtask aircraft makes the hop to Fair Isle. Alternately, if you are keen on adventure and regurgitation, the Good Shepherd IV, a fishing boat, will take you from Grutness near Lerwick to the island over some of the roughest seas available.
Tingwall. The blue and white miniature airplane on the left goes to Fair Isle
Fair Isle airport is a single gravel airstrip, so if the wind is too far off from the axis of the runway aircraft cannot land or take off. Your plans need to be flexible enough to allow for being stuck on the island for extra days (yay!) or stuck in Lerwick waiting for a flight (boo!).
Would I go back to Fair Isle? In a heartbeat. Is it likely to happen? Hard to say, but if not at least I got a chance to live the Fair Isle experience. 😊
Cape St Mary’s, and its Québec cousin Bonaventure Island (still on my to-do list), are without doubt two of the best places in the world to see one of the world’s great birds: the Northern Gannet.
These mighty pelagic birds spend most of their lives out at sea, but once a year they come to land to nest. Their preferred nesting area is a sea stack – a pillar of rock with no connection to the land, so their chicks can be safe from terrestrial predators.
Most of the big Gannet colonies such as Ailsa Crag give good views of flying Gannets but aren’t accessible for close-in views. But the sea stack at Cape St Mary’s is very close to the land. We were able to stand and view the Gannets from about 30m distance, close enough to observe their nesting behaviour and the tenderness with which they treat their mates. And needless to say the photographic possibilities are awesome.
The cliffs around the sea stack also provide nesting opportunities for Black-legged Kittiwakes, Guillemots, Razorbills and Black Guillemots, as well as the occasional Thick-billed Murre. We also saw some interesting birds in the grassy fields around the visitor centre, including American Pipits and Horned Larks. (Though not, as the Visitor Centre suggests, Water Pipits. Were a Water Pipit to show up in North America it would be the first, and would be pursued by hordes of birders from across the continent).
Black-legged Kittiwake
Razorbill
Guillemot, or if you wish to be tedious, Common Murre
Sneaky Thick-billed Murre. I waited 40 minutes for it to raise it’s head so I could see the field mark. 🙂
Cape St Mary’s is at the south end of the Avalon peninsula so it’s a bit of a trek to get there. We managed to combine it with a whale-watching trip from Bay Bulls in a one-day trip out of St John’s.
So if you haven’t been there yet, once the pandemic is subsided the doctor prescribes a visit to Cape St Mary’s! 😊
With 77 Ontario species in the bag by the end of January, followed by a three week Colombia trip, 2020 was shaping up to be a particularly good birding year.
And then came the pandemic…
One by one my planned excursions, both local and international, fell off the schedule and I was left during the lockdown with only virtual birding.
So it was a good opportunity to catch up on birding homework. My Covid projects have included tagging and organizing all my bird photos across several platforms, converting my life list to taxonomic order, and setting up a secure backup process for the images. All very geeky stuff but it has helped fill the birding void.
Going through my photos and records did cause me to remember some of great birding experiences I have had and the great places I have been privileged to visit. So I thought I might share the best of them in a series of short posts so that other birders can be inspired to plan their own visits.
Miguel and Florencio, near Pueblo Nuevo
To be clear, this is not a list of the top ten sites in the world. To begin with there are some legendary places that still remain on my wish list: the Okavango Delta, Cape May, Stewart Island, the south Texas coast, Iguazu Falls, South Georgia and coastal Chennai just to name a few. Rather, these are the top ten sites that I have visited, all of which I hope to re-visit in the future.
Great Birding Sites
What makes a great birding site? Great birds, evidently. Great quality or great quantity, or both if possible. If it is located in an area of natural beauty so much the better. Given a choice I would prefer rustic and rudimentary over comfortable and commercial. Crowded places will never be my favourites (hello, Point Pelee). If the site is remote, then basic but decent accommodation and good local food options are desirable. But really, it’s all about the birds.
Páramo de Cruz Colorada, near Soatá
The List
I would be hard pressed to decide among these sites which is the best, so here they are in alphabetical order:
Cape St Mary’s, Newfoundland, Canada
Fair Isle, Scotland
Hato la Aurora, Casanare district, Colombia
Lake Manyara, Tanzania
Cerro Montezuma, Risaralda district, Colombia
Presqu’ile Provincial Park, Ontario, Canada
Prince Edward Point National Wildlife Area, Ontario, Canada
This article was also published in The Blue Bill, the Quarterly Journal of the Kingston Field Naturalists, Volume 67, No 2, June 2020.
Rufous-capped Antthrush at ISO 8000
I started this article intending to talk about post- processing – the business of editing your wildlife images. But I rapidly realized that it is too big a subject to deal with at once, so I’m going to break it into manageable chunks.
How the Camera Creates an Image
The first stage of the journey requires us to look at what happens when you snap the shutter. In the days of film cameras it was relatively straightforward – light passed through the lens and onto a film of celluloid or plastic. Light-sensitive chemicals on the film reacted to the exposure, producing a negative or a slide.
Digital cameras use a different process to capture an image. As photographers we need to have a basic understanding of how this works so we can understand how the different image file formats work.
In very simple terms, in a digital camera the light is focused on a sensor, which is a grid made up of very small photosites. Each photosite contains a diode that converts light into digital information. In simplistic terms the diode counts the number of photons that fall onto it while the shutter is open, and the circuitry in the photosite coverts that information into a numerical value.
In order to provide a digital image that matches the level of detail and colour that the eye can see, a camera sensor needs to contain millions of these photosites. This density of information allows a digital image to be at least as good as an image from a film camera. But it also explains why digital image files tend to be very large. Each of those millions of photosites generates a numerical value expressed as a byte of between 12 and 24 bits. To give you an idea of how that adds up, with my current camera set to the highest resolution the information stored by those photosites totals 62 million bytes of data for a single image.
Image Formats
The camera’s onboard processors convert those digital values into an image file. There are two main formats for an image file – JPEG and Raw. These formats take very different approaches to the challenge of storing all this data. In simple terms, JPEG transforms data within the camera to produce a finished image, while Raw stores all the information and the user then processes the information at a workstation. Each approach has its the pros and cons. I want to briefly illustrate the difference so you can make an informed choice about which format to use.
JPEG
JPEG (Joint Photographic Experts Group) has emerged as the standard format for most photography tasks. For virtually all digital cameras JPEG is the default format, so if you have not been experimenting with the settings menu you are almost certainly shooting JPEG.
The JPEG format was developed to allow onboard compression of digital images. If you recall that figure of 62 million bytes you will see why for many applications there is a need to compress digital images.
Large files are problematic for several reasons:
They demand large storage capacity on your camera’s memory card
They take more time to write to the memory card, which can limit the number of images you can take in quick succession
They take up a lot of room on the storage drives of your PC, laptop, or mobile device
They require a lot of bandwidth to transmit, so websites will be slow to load and sharing is tedious
To avoid these problems the JPEG format compresses the raw information gathered by your camera sensor and then transforms it into a finished image. This image is stored on your camera’s memory card.
JPEG Advantages
For many uses JPEG format is ideal:
JPEG images are small enough to be easily viewable and shareable.*
Virtually all devices and software are compatible with JPEG files.
The simple image editing software available on your cell phone, tablet or computer is designed to use JPEG images.
JPEG is supported by HTML, the language used in creating web pages.
*Note: JPEG files can be created using different compression levels. Lower compression levels lead to better quality but also larger file size. JPEG Fine files are the least compressed (4:1) but therefore the largest. At about 10MB each in the Large size they are not easily shareable.
JPEG Disadvantages
However, there are limitations to JPEG that you should consider. Most of these limitations result from the way the JPEG algorithm compresses the image file size.
The process by which JPEG compresses a file is highly technical bordering on incomprehensible, but in the simplest possible terms it reduces the size of the file by calculating average values for 8×8 blocks of photosites (thus each block replaces 64 sets of information with one). It then reduces the level of information about colour. Based on the understanding that humans have difficulty discerning small variations of colour, JPEG looks for areas that have similar hues and replaces these small variations with a single average colour.
This process can result in a much smaller image file, but the key thing to remember about the JPEG conversion process is that once the image is created any information that the conversion algorithm considered unnecessary is lost and unrecoverable.
This is why JPEG is classified as a “lossy” format. As noted, a certain amount of information is discarded when the image is originally created. Moreover, each time you recompress the image, by making a change and then re-saving it, some additional information is irrecoverably lost. And if you crop an image – for example to provide a close-up view – the parts of the image that you cropped out are lost forever.
A further implication of JPEG is that, because it produces a final image, the camera settings in use when the image was taken are “baked in”. If you realize afterwards that you had the wrong white balance or picture control settings for example it may not be possible to correct the image.
Raw
Raw is a generic term for a file that saves all of the information from an image, with only minimal processing. This information needs to be converted and edited at a workstation before an image is produced.
Raw format is not available on all cameras. All modern digital single lens reflex cameras (DSLRs) and mirrorless cameras can shoot Raw, but only a minority of bridge cameras have the capability and point-and-shoot cameras generally do not.
Raw Disadvantages
There are several disadvantages to shooting in Raw:
Raw files are big. With the camera set-up I currently use, each image file is about 29MB. So a 64GB card will hold about 1,300 Raw files instead of 13,000 JPEGs.
You need to process your Raw files at home in order to generate finished images. This is time-consuming compared to the instant image generated by JPEG.
To process the files you need specialized image editing software (though note that you can download free editing software from your camera manufacturer – all the major camera brands provide this).
Each camera manufacturer has its own a proprietary standard, so a for example a CRW file from a Canon camera is not compatible with a NEF file a Nikon generates.
For Raw files to be printed, shared on a mobile device or posted on the internet you need to create and export a JPEG image.
So why do most professional wildlife photographers shoot in Raw?
Raw Advantages
Lossless. Raw files are lossless. All the information your camera gathered is available to you. Nothing is averaged out or approximated. As an example, an 8-bit JPEG image is limited to about 16.8 million colours, whereas a 12-bit Raw image can show up to 68.7 billion. What this means in the real world is that you will get more even transition between colours, without the possibility of the pixilation that sometime happens with JPEG (remember that JPEG averages out colours into larger blocks).
Non-destructive. The adjustments you make in post-processing do not change the original file. All changes are saved in a separate hidden file called a sidecar. So regardless of how much you crop and adjust an image, you always have the original file available. With JPEG every significant change degrades the image, and things that are cropped out cannot be recovered.
Settings are not baked in. With Raw you have complete ability to adjust most of the camera settings during post-processing, including exposure, white balance, sharpening, colour gamut, picture control, and contrast.
Greater dynamic range. Raw files are typically created in 12 or 14-bit format, compared to 8-bit for JPEG. This may not seem like a big numerical difference, but remember we are looking at a file made up of millions of bytes. The math is somewhat beyond my ken, but the impact is that in each stop of a camera’s dynamic range there is far more information space available in a Raw file. At the bottom end of the dynamic range – areas of deep shadow in a photograph – there are 65 times as many gradations in a Raw file as in a JPEG.
This has important implications for wildlife photographers. We often find ourselves trying to capture images in areas where there is both bright light and deep shadow. Using JPEG, those shadows will tend to be featureless dark blobs, whereas with Raw we will be able to see the same details that our eyes would see.
Moreover, the greater ability of Raw to capture detail in shadow allows us to apply shadow reduction – a very useful capability that I will talk about in future articles on post-processing.
Exposure Correction
But perhaps the most striking advantage comes when we shoot images at incorrect exposures. The perfect photographer would never do this, but for the rest of us there will be numerous situations were we have the camera set up for bright daylight only to have a momentary glimpse of a bird – and typically it’s a good one – peeping out of a dark corner.
The higher dynamic range of the Raw format means we can correct a badly underexposed shot in post-processing and end up with a good image.
Consider this example. I deliberately underexposed this shot of an American Goldfinch in my garden. I did this as an experiment, so please ignore the uninteresting composition. The camera took two simultaneous images – one in Raw and one in JPEG Fine.
Original image
JPEG
Raw
The images were very dark – I had to increase exposure by about four stops. But the results are clear. The quality of the Raw image is pretty good: there is full feather detail and the colours look right . The JPEG image on the other hand is dreadful. The colour is over-saturated, green blobs have appeared in the breast and belly plumage, and the whole bird looks flat and dull.
Recommendations
If you have read this far, you have probably realized that I am a fan of the Raw format. I believe that in wildlife photography the aim is should be to produce an image that replicates as closely as possible how the creature (bird/animal/plant/butterfly/reptile) looked in the wild. I have found that using Raw format and carefully post-processing the image gives me the best chance of doing that. And there is an element of craftsmanship involved that I find appealing – I prefer to make my own choices rather than having the camera make decisions on my behalf. I am also not worried about file size given that hard drive storage capacity has become increasingly inexpensive.
So is there an argument for using JPEG? The fact remains that some very good images have been created using JPEG. You may well decide that you prefer the simplicity and efficiency of JPEG. If so, I would recommend that you use the lowest compression setting: JPEG Fine. This setting creates a 4:1 compression, so the files are still fairly large, but at 4:1 you will not see any of the artifacts or errors that can creep in at higher compression ratios.
When we last saw our heroes, they were being bird-bedazzled during the long march into the grassland plains of the Llanos…
After a long, hot and bird-filled journey we rolled into the lodge in the late afternoon. Our options were: (a) have a well-deserved siesta, relax and await dinner, or (b) bird the local area. A difficult dilemma, one might imagine. So by dinnertime Pale-headed Jacamar, Southern Beardless Tyrannulet and Pale-eyed Pygmy-Tyrant among others had found their way onto the trip list.
After thoroughly sampling the full Amazonia experience, our next key target in the 2020 Colombia expedition was the Llanos – a huge grassland plain that stretches over eastern Colombia and Venezuela. About 500km of driving lay ahead of us from Bogotá. Obviously we had to look for Eastern Andes endemic birds along the way, so several days were to pass before we reached our jumping-off point in Paz de Ariporo.
We spent some time working the forests near Santa María, Boyacá, and then another couple of days climbing up into the foothills near Monterrey. I will just mention a few highlights from these stops before we get to the main event.
Fasciated Tiger-Heron (juvenile) on the road to Santa María
Santa María
This is a small town (less than 5,000 inhabitants) in an out-of-the-way corner of the Andes. It had a short period of growth during the construction of the La Esmaralda dam and power plant, but has now lapsed back into small-scale agriculture and torpor, enlivened by a bit of eco-tourism. It seems that Santa María is a hotbed for arachnid species, though we did not encounter any spider tourism groups during our stay.
No arachnids, but there were plenty of butterflies.
Development is not permitted in the forested hills surrounding the reservoir, so they are home to a large variety of birds. We managed to add three new entries to the birds-whose-names-start-with ant category, the smart-looking Golden-headed Manakin, Rufous-and-White Wren, Crested Spinetail and the enigmatic and highly prized Spotted Nightingale-Thrush. A evening of owling was quite productive. And I also saw more Cerulean Warblers in three days than I have seen in ten years in their breeding range. Photos of the more cooperative species are below.